What's New

Welcome to my blog where I post tutorials, family adventures, art projects, cleaning and organizing ideas, plus any other bright ideas that pop in my head. Hope you enjoy them!

Main Posts Background Image

Main Posts Background Image
Showing posts with label sewing. Show all posts

7.4.20

Sewing Fabric Face Masks for Vulnerable Family and Friends


What a month! It's hard to believe that we are all 'holed up', hopefully safely, in our homes for the foreseeable future. At first, to be honest, I was kinda depressed. I had been watching the virus devastate Italy long before most Americans were really concerned.


The reason is that I've been working on my art degree for the last four years, and learning sculpting (like my father) from Mike Kirby at The Sculpture Workshopin Houston. One of the last goals for my degree was to make an art trip to Italy. So my friend Chris and I purchased our tickets in August of last year. It's hard to imagine that that trip is canceled now, but how my heart goes out to everyone there! Chris and I have been praying for them since Day 1. But we also were trying to figure out whether or not our month long stay in Florence, Rome, and Venice was really a wash or not. It was. We are hoping to get credits for our tickets.


At first I did what I'm sure most of you did--stock up! I probably started a bit sooner than most of you due to keeping a watchful eye on Italy in early February. Eventually, my husband Tim came home and set up a home office. He's been working in Houston for the last seven years, but all of a sudden he's home again. Yay!

My youngest son got activated in the Texas Army National Guard. He's helping direct traffic at Huntsville Memorial Hospital where they are testing about 250 people a day. He can't come home and doesn't want to out of concern for us. So I was missing him too! I was really at loose ends at that point.


I don't know why it took so long, but eventually it occurred to me that I should sew some fabric masks. I knew I ought to--not that many people are super 'in' to sewing, but I am certainly one of them! :) At first, I just thought I'd help with the MakeMasks2020.org movement. But before sewing for them, I offered to make some fabric masks for the most vulnerable friends in our church at Koinonia and extended family in need. I got a lot of takers on that offer. It made me so happy to offer that peace of mind to my dear church family.


On Saturday, I made eight masks using the pattern suggested by MakeMasks2020.  A friend donated two bags of quilt scraps, and another friend donated probably 30 spools of ribbon! Sewing ties (since the elastic is gone) doubled the time it takes for me to make one of these.

What started out as a 'whim' turned into a totally unexpected opportunity to bless others in need. When the President and the CDC said, "Ok--wear masks." most people didn't have one.

After posting some photos on Instagram and Facebook--I ended up with 56 orders! Friends, neighbors, and family started messaging me asking if I could make a few for them. I am even making a couple of masks for my good blogging friend Gloria and her mom. She's an amazing artist and a kind woman caring for her elderly mother.

Isn't it funny how the Lord just directs you.. even when you have no idea what you are called to do to contribute during a crisis? So I sewed 20 masks today and delivered four. I bought a postage scale and set up an account with stamps.com, so I don't have to go to the post office to ship stuff and bought 30 envelopes. Hopefully I'll be shipping out my first 'orders' this Friday!


We can't do much against this virus but stay home--and that's huge! And we can pray and encourage each other online.  But for me, it was time to sew! I feel so glad to be able to do my part for the elderly, friends with asthma and serious lung issues, family with vulnerable children, a friend undergoing chemo, and friends with diabetes.


The MakeMask2020.org project's purpose is to sew fabric masks and send them to companies who have N95 masks in stock, but don't really need medical grade masks. We sew fabric masks for them so they can send their medical grade masks to local hospitals. What a great idea!  After I send mine to my friends, I'll start sewing for them.I delivered four masks today and mostly finished another 15! Tomorrow I'll keep working. I've made about 20 total and have about 40 to go!

If you are interested in sewing for them, please check out their site! Or maybe, like me, you have friends and family who suddenly find themselves needing a mask, but can't buy one. Either way, it's a great way to bless others in this difficult time. Let me know if you decide to jump on the sewing bandwagon this month!

Praying for you and yours!

Happy Homemaking!
Donna


11.5.15

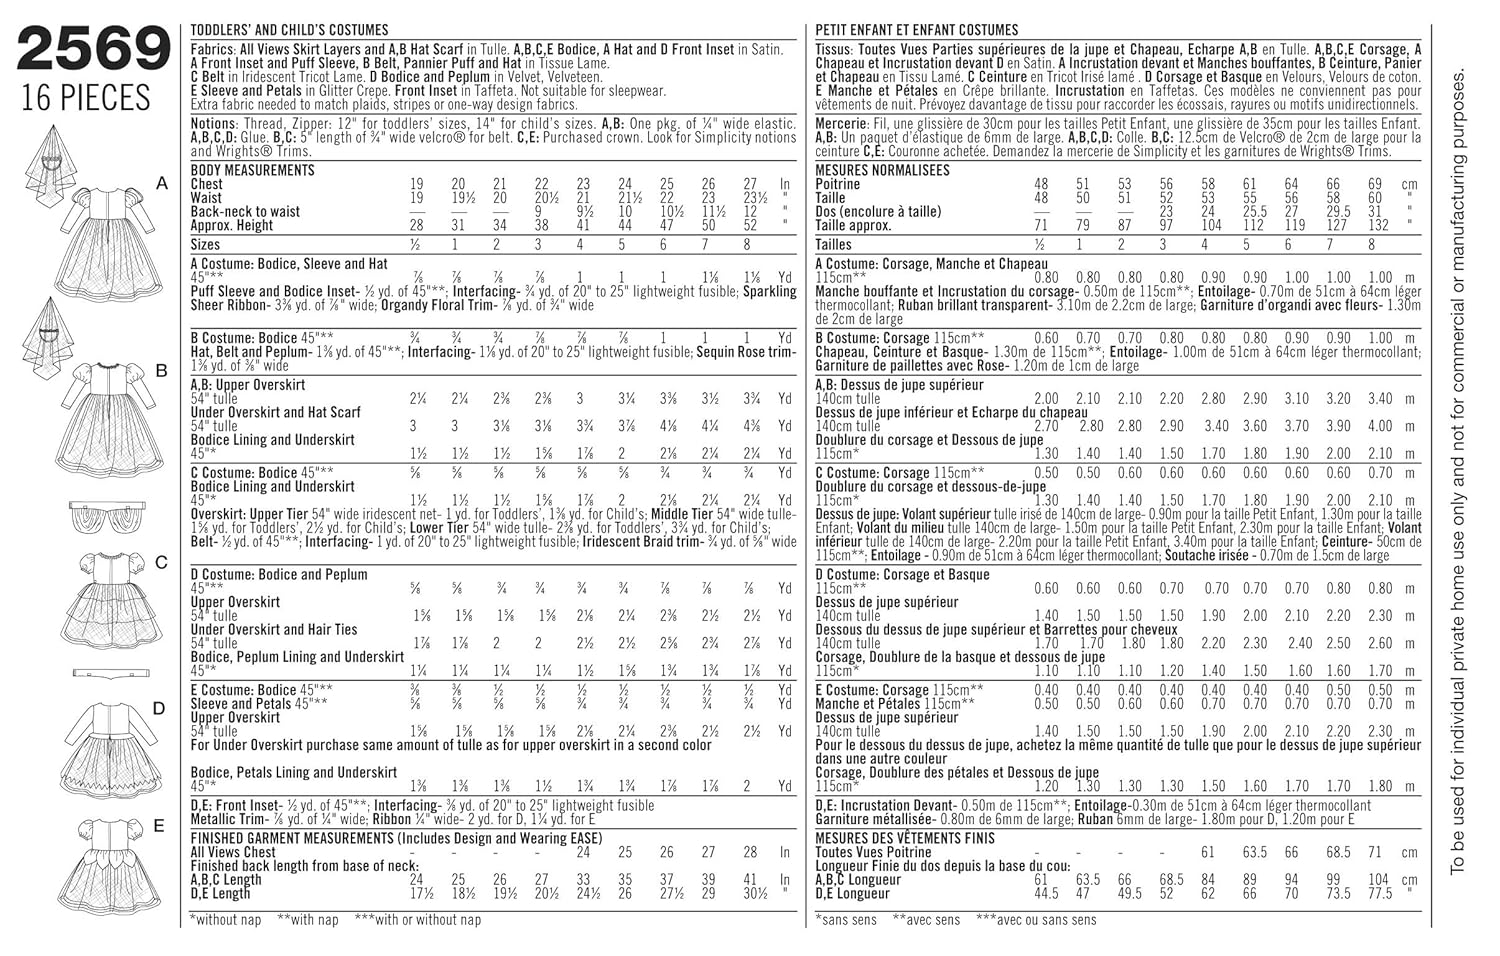
Princess Dress with a Little Extra 'Pizzazz"- Simplicity 2569 with Online Shopping List!

My sweet granddaughter, Lena.


My daughter-in-law, Elisabeth, wondered if I could make the granddaughters, Lena (5) and Lillie (1), princess dresses for Christmas. I thought that would be so fun and it was!  I fell in love with this Simplicity Sewing Pattern 2569.


While scanning the clearance aisles, I found some luminescent organza fabric and decided to substitute it for half the tulle. It was a bit more pricey, but on sale was not too bad and--wow--it really did add a lot of 'pizazz' to what would have been a fairly plain skirt.


Turns out the first dress was a bit too small for Lena so little Lillie will get the shorter pink one. I shortened the skirt because her mom thought it might be too much to manage for a toddler.


However, Lena, begged for a longer skirt and as I had to lengthen the bodice for her long torso anyway,  I made her dress the length called for by the pattern. Her dress was all in purples. It's hard to say which I like better!


 Matching up the skirt to gather proved to be a big challenge but gathering was very easy--surprisingly so. For this second skirt, I  just sewed two long rows of stitching as it gathered so easily.


This part was the hardest--stitching the gathered skirt to the lining, but even that went pretty well considering the thickness. The netting crushes down pretty flat when you actually stitch through all the layers.

If you are making the smallest size, I'd suggest trying to take out a bit of the width of the peplum because it's very wide on a toddler. I'm saving the scraps to make 18" doll dresses to match for their birthdays.  


Here's the shopping list for this pattern:

(Note: If you want to see a picture of an item, just hover over the link and it will pop-up. If it doesn't, you may need to disable adblock for my website.)

For the pink dress 

Fabric:

Notions:

For the purple dress

Fabric:


Lillie, now 3, wearing dress B, and Lena, 5, wearing dress A.


On Skype, Lena and Lillie were prancing and dancing all over the  living room!  They were so enchanted with their new dresses.  Her mom said Lena never took her dress off all day.

 It's so fun sewing for grandchildren! 

 If you have a princess dress you've sewn and would like to share, send me the link on my contact form below. I'd love to see it!

Happy Homemaking!
Donna

23.6.11

How to Cover Baskets with Fabric…Sew or No Sew Methods


One of my favorite organizing ideas for our very busy office/ sewing room/ school room/ craft room, was to label a bunch of fabric covered baskets with the types of activities done in this ‘activity’ room. 


Up until a couple of months ago, this room was ALWAYS a mess. What can you expect when I have three-four computers and two sewing machines all being used in the same 14-16’ room?  We have four desks (one a huge U-shaped one) taking up most of the room. 


fabric baskets 007-2000


So I purchased some small 6 x 11 fabric (approximate size ) baskets from Wal-mart at $2.50 a piece and labeled each with an activity. I have baskets for our main sewing supplies, devotional materials, school materials, pet food and medicines, bills & receipts, my father’s business papers, computer games, photos, gift wrapping and other postal supplies, returns, and filing.

I was thrilled to discover that this worked perfectly to contain the chaos. Someone can walk in, grab the postage/shipping basket, wrap a package and label it using the labels, sharpie, tape and scissors. Then all they have to do is pitch everything back in the basket and put it back on the shelf.


fabric baskets 003-2000 


The only hitch in my mind is that they were so ugly! If money is not problem for you, there are a lot of cute baskets out there, but I bought baskets that cost very little and were very plain. In fact the fabric was some kind of synthetic that wouldn’t last a week of regular use.

Really though, it’s nice to be able to coordinate your baskets with the theme of your room. I think there’s nothing prettier than a fabric covered basket. There are more involved ways that I can think of to make a nicer basket cover, but I didn’t have a lot of time to get ready for the company that was coming. I needed a quick solution.


DSC07266-3000


SEWING METHOD
I started out sewing these covers exactly the way I cover everything else..pillows, people, furniture cushions, podiums…

DSC07261-3000
  1. Cut out pieces to fit all ‘faces’ of the basket. (I cut a long rectangle for the big sides..and then ‘squares’ for the sides.
  2. Pin the pieces wrong side out onto the basket.
  3. Pull the perfectly tailored cover off.
  4. Sew the seams.
  5. Finish the raw edge by trimming off the excess.
DSC07267-3000

Then either ….
  • hem the raw edge
  • fold the raw edge over and glue in place
  • sew a ‘casing’ in the upper edge of your fabric cover and insert elastic.
  • or just glue the raw edge to the basket..which is what I did this time since I was in such a hurry.
If you want to this VERY nicely, you could do TWO covers…and turn one inside out to cover the INSIDE of your basket as well as the outside.

fabric baskets 010-2000 

NO-SEW METHOD 

If you aren’t a seamstress…or if you run out of time as I did AND you can wrap a gift..then this is the method for you! :o)
  1. Take your basket and simply place it in the middle of a rectangle or wide strip of fabric big enough to cover both large sides with just a little bit of excess. 
  2. Fold over the edges (over the rim and into the basket about 1”) and either pin or glue in place.
  3. Now trim off some of the excess where the basket angles down to the base since most baskets are usually wider at the top than at the bottom.
  4. Fold the fabric up and over the rim of the basket on both sides so the fabric is pretty snug. Pin in place if necessary.
  5. Hot glue the raw edges to the basket to attach it.


fabric baskets 013-2000
fabric baskets 011-2000

  1. Now for the ends.  Lay your basket on one end and trace around it on the fabric with a pen (inside of the fabric..not the outside).
  2. Cut two end pieces out  of your fabric leaving a border of about a half an inch or so with enough raw edge to fold under neatly.
  3. Iron the end pieces so that the raw edges are folded to the inside and it’s the perfect shape of the ends of your basket. (Leave the top edge unfolded.)
  4. Now glue your end pieces in place. The folded edges should cover the raw ends of your wide piece of fabric.  Glue the top unfolded edge over the rim of the basket.
  5. If you want to this again for the inside, you can cut out two of your long rectangle and your end pieces. If you do this, be sure to fold under the top edges of everything so it looks nice at the rim of the basket.


  6. fabric baskets 012-2000

There are all kinds of ways to tweak this, but hopefully I’ve gotten you started. Try using scraps of color coordinating fabric. I used a lot of scraps so I had to find all sorts of ways to glue my pieces in place.
But I do think the results were pretty good. I loved having nice fabric baskets and it was the perfect touch for what is ‘mostly’ my sewing room.  


Be sure to email me if you have any questions. Have fun sprucing up your messiest room!  Baskets are lifesavers when it comes to clutter!  

What is your favorite way to use a basket in the house?


new signature

4.6.11

How to Re-Cover Patio Furniture

weight journal and outdoor furniture 026-2000      
Heat, rain, and freezing temperatures all take their toll on our patio furniture over time. Before you know it, it’s time to replace those cushions. But the price..Yipes!  In these tight times, some of us would prefer a more frugal option to just throwing out outdoor furniture cushions and buying new ones.


patio 1

I bought our current patio furniture on Craig’s list about two years ago and they were already pretty iffy. I re-painted the legs and frames with outdoor Rustoleum spray paint which helped with the flaking parts, but the cushions needed to be re-covered too.


DSC07276-3000 The grandkids love this swing..with or without the cushion. :o)


At a huge neighborhood wide garage sale, I also found a porch swing. My granddaughter and grandsons LOVE this swing. We spend a lot of ‘Grandma’ time on it. :o)  But the cushions on it were even worse.

 weight journal and outdoor furniture 024-2000


About two years ago, I finally got around to buying a big roll of upholstery fabric. Calculating how much I needed wasn’t easy. Really, the best thing to do is draw out the measurements of every flat surface on graph paper.
 calculating yardage 2
To calculate the yardage you really have to decide which dimension makes the best use of the fabric. Draw  a square that is 58” wide on your graph paper..it should be the length of the paper. That’s the normal length of upholstery fabric.  I count every square as 2 inches.

Then draw squares for the front and back of your cushion on the paper side-by-side. Add other things like a big swing..or side pieces if your cushions have that..or a canopy. You want enough fabric so everything matches.

Add the length of each cushion plus a little extra for seam allowances and a four inch gap in the middle between the top and bottom cushion to give you the total length. Divide this total by 36” and it will give you the yardage you need for one cushion.  Multiply this times the number of cushions you need to cover. 

For me this was 1.5 x 4 = 6 yards of upholstery fabric..for just the four cushions. I also bought more for the swing.

Easter Service Porch covers 059-2000

Sewing the cover is much easier than figuring out the yardage! LoL!  I looked carefully at my chairs design and this is how they did it. Your patio furniture may be very different. Take photos so you can remember how it all went ‘together’! You will have to tweak my instructions to work for you, I’m sure. :o)

Note: You don’t have to copy things exactly! I didn’t sew the ‘headrest’ seam at the top. I just left that fabric intact.

There are two ways to  recover your furniture.  If you can cut the fabric off of the old cushions in one piece. You can use this piece or pieces as a pattern to cut out the new. This is the easiest way. But for me, this wouldn’t work because there was a seam in the middle between the top and bottom of the cushions. 
The second way is to just lay out your cushion and cut out the fabric to fit.

First, I laid out my cushion on the new fabric and cut out a big square which would cover the front and back of my cushion. (Watch to make sure you nap is right! I wanted my stripes to go vertically. ) 

I pinned this on wrong sides out to get the perfect fit, then pulled off the case and sewed it.

Easter Service Porch covers 068-2000 
I also cut it out long enough to allow for seams and to leave a 4” gap between the top and bottom. * I didn’t know I needed a gap until I looked at how the orignal was pinched and sewn together. See photo just below.
(*The original cushion manufacturers folded the cushion at this gap and pinched up the excess fabric and sewed it to cause the cushion to retain it’s fold.)


Easter Service Porch covers 062-2000

Next, remove the old fabric from the cushion. I combined the front and back measurements and just cut out a big rectangle that would allow me to fold the fabric at one side seam. (Less sewing!). 


Easter Service Porch covers 003-2000
Giant ‘pillowcase’ of made of indoor/outdoor fabric.

I folded the fabric right sides together and sewed the side seam and top seam.  What you end up with is something that looks like a very large pillowcase.

Next, slide the top cushion in all the way to the end. Then slide the bottom cushion tight up against the top one. If you added 4-6” for a gap in the middle, you should have quite a bit of excess at the bottom. This is necessary!

Easter Service Porch covers 060-2000 

Now fold the fabric in about 1/2 and inch and top stitch the opening closed. You will have to lay your cushion out on the table next to the machine to manage this. It’s tough but can be done!
    weight journal and outdoor furniture 004-2000

Or you can just hand sew the opening closed with upholstery thread and a blanket stitch. I did this the first time, before I figured out the alternative way.  Actually..all four of my cushions got sewn differently before I came across the best method!


weight journal and outdoor furniture 002-2000

Now, maneuver the bottom cushion down to the end of the cover so the 6” gap is in the middle. 

weight journal and outdoor furniture 001-2000

Pinch up this excess cloth (top and bottom fabrics) and sew a long basting or running stitch with upholstery thread all the way across (through all the layers of fabric) to keep the excess fabric pinched.


weight journal and outdoor furniture 003-2000
You can see here that I also had to piece some of my fabric as I underestimated how much fabric I needed.


It won’t show much because it’s buried in the fold of the chair. This doesn’t have to be a perfect job! The upholstery thread is very strong and will hold. :o) 

weight journal and outdoor furniture 022-2000

to do the really long chair cushion was a puzzler to me. In the end, I did the exact same thing with the big wide set of pillows that I did with the little ones. I laid the huge cushion out on my upholstery fabric with the big gap in the middle between the top one and bottom.

Easter Service Porch covers 063-2000

Then I put made my pillow case and maneuvered the two long skinny cushions into it. 

Easter Service Porch covers 061-2000


Yes, it took a little while to hand sew that big pinch in the middle, but it was worth it. A little hand sewing never killed anyone. Ha! I did sew two rows…to keep the two long cushions in their place.


Easter Service Porch covers 066-2000 

I left the gap ‘wide’ rather than pinching it because they did the same thing on the original pattern.

Easter Service Porch covers 065-2000


Easter Service Porch covers 064-2000

I did make a panel to hook over the top of the swing frame and attached it to the back side of my pillow case before sewing the front to the back.  But that’s not strictly necessary. You can always sew ties to attach the cover sturdily to the frames.


porch chair covers-2000 
Obviously, you have to be a little sewing savvy to do this. But really, I never sewed ties to anything. It all sits in the chairs just fine. We love them and they look GREAT! So much better than the ratty old ones we had.


our back deck 

What a fun summer project! Can you believe it only took 30 minutes per cushion to do the patio chairs? This really is quite an easy project to do! Don’t be scared..just do it! :o)  Email me if you have questions.


new signature
“There's nothing half so pleasant as coming home again.” ~ Margaret Sangster

Friends of Comin' Home

Thanks for visiting!

Search This Blog

Followers

Copyright Comin'Home 2020. Powered by Blogger.

Error 404

The page you were looking for, could not be found. You may have typed the address incorrectly or you may have used an outdated link.

Go to Homepage